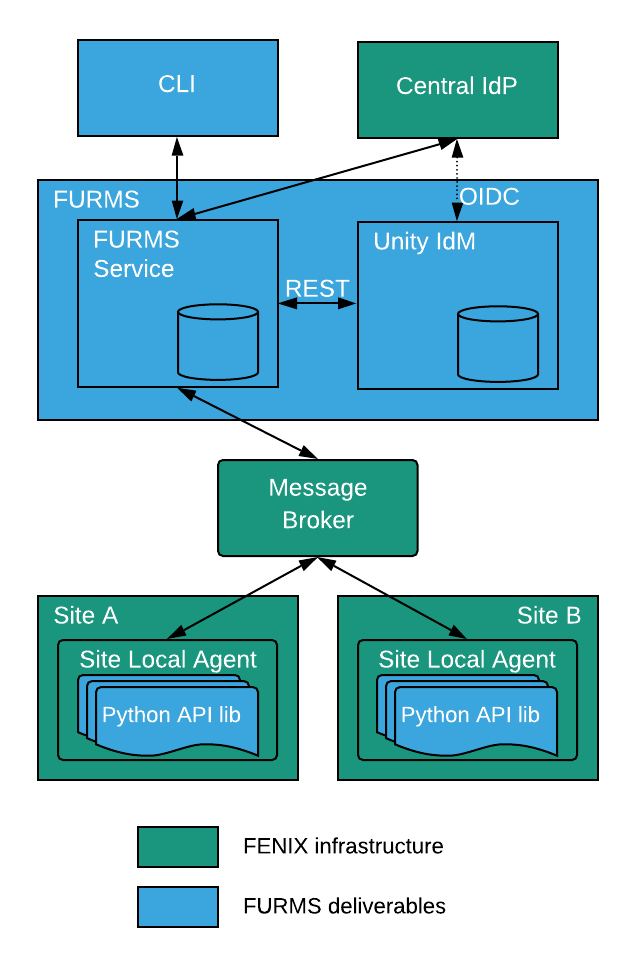
FURMS architecture overview
FURMS system consists of two services:
-
Unity-IdM: an existing open source software which covers:
-
authentication
-
user provisioning
-
groups management (with persistence)
-
user management including user attributes and group memberships (with persistence)
-
notifications functionality
-
-
The FURMS service
-
a complete UI for the FURMS users (only sign-in and sign-up views will be hosted on Unity)
-
communities, projects and sites management,
-
control and assignment of budgets
-
accounting
-
external REST API
-
The administrative control of the FURMS system is available via the dedicated FURMS service UI, however some rarely used system administration actions will require the use of Unity-IdM administrative UI. An example of such action is the modification of email message templates used for notifications sent by FURMS. Note that only the FURMS administrators will need to use Unity-IdM administrative UI, other types of users (e.g. site admins or community admins) will not have to use it.
The following figure shows high level overview of the interactions between FURMS system and FENIX infrastructure.
Unity-IdM
Unity-IdM is an existing software providing authentication and user management service. Unity-IdM allows its users to enable authentication to their web services using various protocols, with different configurations for many relaying parties. The actual authentication can be performed using the built-in, feature-rich users database or can be delegated to one of supported upstream identity providers.
The information obtained from upstream IdPs can be flexibly translated and merged with the local database (if needed) and re-exported using other protocols. Unity-IdM can authenticate both locally and using SAML and Oauth authentication protocols. Authentication can be performed against locally stored credentials or delegated to external service.
The following figure shows the high level Unity-IdM architecture
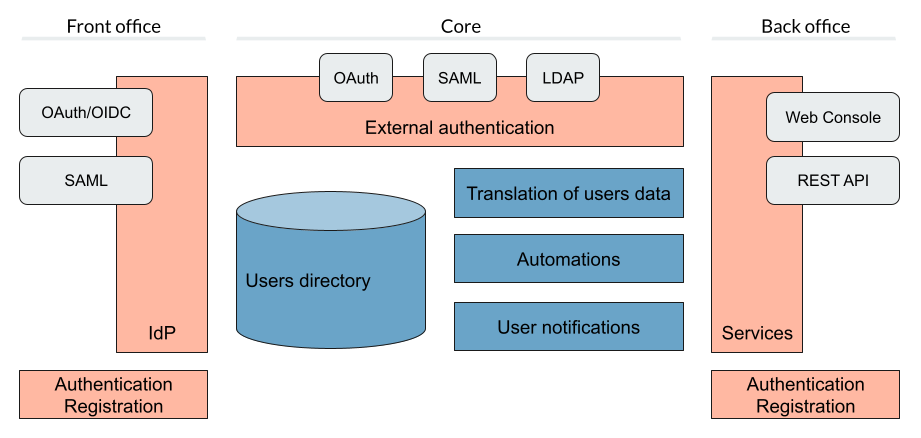
More of the general information on Unity can be found at https://unity-idm.eu web page, while the reference documentation is available at the https://www.unity-idm.eu/support/ sub-page.
FURMS installation from scratch
This section describes how to install the FURMS system from scratch. The installation is done through Ansible scripts and covers installation of FURMS service as well as Unity-IdM service. Both services work closely together.
Prerequisites
Hardware requirements
Both services can be installed on a single machine, or on two separate ones. As the communication between the servers is intensive a single host installation may be preferred.
-
Disk space: installation of both services together requires less than 1GB of disk space. It is advised to reserve significantly more in order to preserve log files and multiple updates (each is installed in separate directory by default).
-
RAM: minimum of 1GB of free memory per each service must be reserved. It is advised to provide 4GB per service in order to handle heavy load.
-
CPU: there are no strict restrictions, however at least 2 cores per service are advised. Production environment with many users may make good use of a more powerful machine.
Java
FURMS system requires Java Runtime Environment. The version 11 is the supported Java version. Install JRE on host(s) where services are going to be run.
Ansible
Install Ansible tooling on the host which will control FURMS system through scripts. Follow the Ansible installation guide.
Database
Install any recent version of PostgreSQL on the host of your choice. The setup of database requires creation of two databases each with a separate role (user) which is able to connect to the database. One database is utilized by FURMS service and the other for Unity-IdM. This information will be used later on in the Ansible group variable file to setup databases configuration during installation.
Broker
Install any recent RabbitMQ broker with support for AMPQ 0.9.1. The broker setup requires:
-
configuration of the TLS in order to enable encryption on the protocol level,
-
definition of the RabbitMQ virtual host utilized for the FURMS purposes,
-
definition of the client user name and password with
-
connection rights to FURMS virtual host,
-
privileges to provision queues within this virtual host
-
permissions to write messages to AMQP default exchange (
amq.default)
-
The virtual host name, privileged client user name and a password, as well as public CA certificate which was used to sign credential for the broker are used later on in the Ansible group variable file to setup broker connection during installation.
The broker service is considered as the infrastructure resource, however for demonstration purposes and ease of configuration, below is an example of rabbitmq.conf file with TLS support turned on.
|
listeners.ssl.default = 5671

ssl_options.cacertfile = /etc/rabbitmq/certs/ca_certificate.pem
ssl_options.certfile = /etc/rabbitmq/certs/server_certificate.pem
ssl_options.keyfile = /etc/rabbitmq/certs/server_key.pem
ssl_options.password = <put-keyfile-password>
ssl_options.fail_if_no_peer_cert = false
ssl_options.verify = verify_none
ssl_options.versions.1 = tlsv1.2
Please refer to the RabbitMQ TLS Support guide for more informations.
Connection setup for site’s local agent
The communication between FURMS and particular site is done through two queues which are declared by FURMS when FENIX administrator creates a site. Dedicated queue names consists of site’s identifier and a special suffix:
-
<siteid>-site-pub- queue is used by site to publish messages to FURMS -
<siteid>-furms-pub- queue is used by FURMS to publish message to the site
The site’s identifier is visible on Site administrator’s Settings page as 'Site Id'. When the Site Id is e.g. ygmr6, then the created queues names are:
-
ygmr6-site-pub -
ygmr6-furms-pub
From Site’s point of view, broker administrator must define:
-
an exchange of
directtype within FURMS virtual host with:-
name set to
<siteid>-site-pub(note that an exchange and site publish queue names are the same), -
binding created, and configured to route messages with
<siteid>-site-pubrouting key to<siteid>-site-pubqueue
-
-
the client user name and password with a connection rights to FURMS virtual host, and privileges to:
-
write messages to
<siteid>-site-pubexchange, -
read messages from
<siteid>-furms-pubqueue,
-
| In order to setup a connection from site agent to broker, the aforementioned user name and password is required as well as the public CA certificate which was used to sign credential for the broker. This information needs to be handed over to the local site administrator in order to setup encrypted and authorized connection to FURMS through the broker. |
Installation best practices
There are two recommended configurations of FURMS system that can be used to install the services:
-
behind HTTP proxy
-
exposed directly
Depending upon which is selected, there are some ramifications on the configuration to be made.
HTTP proxy configuration
It is assumed that in this configuration the proxy has installed the certificates signed by legitimate authorities. In this case the FURMS system can be equipped with self-signed certificates. One pair of PKI credential for Unity-IdM and the other for FURMS Service.
Note that for such configuration the truststore needs to be carefully prepared. The general rule of a thumb is that it must contain at least:
-
the public CA certificate which is at the top of the certificates chain used to sign Unity-IdM credential,
-
the public CA certificate which is at the top of the certificates chain used to sign Central IdP credential.
Services exposed directly
In this configuration, both Unity-IdM as well as a FURMS service must be equipped with PKI credentials signed by legitimate authorities. The truststore can be configured to use the system one. On RHEL like system the default place of a trustore is /etc/pki/java/cacerts/etc/ssl/certs/java/cacerts
In both setup cases, there are configuration options in the Ansible group variables file, that need to be properly filled according to your infrastructure setup |
FURMS devops tools installation utility
In order to install the latest released FURMS devops tooling, use the FURMS devops tools installation utility.
Enter to the directory of your choice and run the following commands:
> export FURMS_ROOT_DIR=/home/furms-app/staging
> curl -L https://raw.githubusercontent.com/unity-idm/furms-devops/main/install-tooling/install_furms_devops_tooling.py -o $FURMS_ROOT_DIR/install_furms_devops_tooling.py
> chmod +x $FURMS_ROOT_DIR/install_furms_devops_tooling.py
FURMS Ansible scripts
Use the FURMS devops tools installation utility to install the latest Ansible scripts.
Enter to the directory where the utility was installed, and execute the following:
> cd $FURMS_ROOT_DIR
> ./install_furms_devops_tooling.py
Installation of latest FURMS devops tools into /home/furms-app/staging
Command finished successfully
> ls -l
lrwxrwxrwx. 1 furms-app furms-app   32 01-16 12:27 furms-devops-tooling -> furms-devops-tooling-1.0.0
drwxr-xr-x. 5 furms-app furms-app 4096 10-28 15:36 furms-devops-tooling-1.0.0
-rwxr-x---. 1 furms-app furms-app 3057 01-16 12:25 install_furms_devops_tooling.py
The aforementioned tool can be run at will, and the consecutive executions will update the FURMS Ansible scripts to the latest version.
Setup Ansible configuration files
Create the inventory and group variables files in the $FURMS_ROOT_DIR directory (where FURMS devops tooling was installed). You can base on the example files that are delivered with the Ansible tooling.
With regards to the inventory file, depending upon whether you are going to install FURMS system components on local machine, or on remote hosts, there are two different example files prepared. If you intend to install components on a local machine, then use inventory.local file in the example below, otherwise use inventory.remote to have installation performed on remote hosts.
> cd $FURMS_ROOT_DIR
> cp furms-devops-tooling/local-cfg-sample/inventory.local inventory  # or inventory.remote
> mkdir -p group_vars
> cp furms-devops-tooling/local-cfg-sample/group_vars/all.yml group_vars/
The following files should be copied to the current directory:
-
inventory -
group_vars/all.yml
Inventory
Ansible can work against multiple machines in your infrastructure. It does this by selecting systems listed in Ansible’s inventory file. Make appropriate changes to the copied example of inventory file.
Group vars
All of the FURMS deployment settings are configured in the all.yml Ansible group file. The example of this file can be found now in $FURMS_ROOT_DIR/group_vars/all.yml file.
The devops tooling provides also a file that is filled out with example values. A file sample demonstrates the configuration of FURMS system behind a proxy, please see $FURMS_ROOT_DIR/furms-devops-tooling/local-cfg-sample/group_vars/all.yml.behind-proxy for a reference.
|
The following table provides description of all configuration options.
| Property name | Type | Description | ||
|---|---|---|---|---|
installDir |
filesystem path on Ansible management host |
Directory name where FURMS services will be installed e.g. "{{inventory_dir}}/services" |
||
furmsVersion |
string |
Version of released FURMS software e.g. "1.0.0" |
||
backupDir |
filesystem path on Ansible management host |
Directory name where FURMS backup files are stored by dedicated Ansible playbook. For more information go to Backup section. |
||
trustStore |
FURMS system trustrore used by FURMS service as well as Unity-IdM. It must contain at least:
|
|||
trustStore.file |
filesystem path on Ansible management host |
The JKS format keystore path. |
||
trustStore.password |
string |
The password of the keystore type truststore |
||
--- Unity-IdM configuration --- |
||||
unity.host |
string |
The hostname or IP address for HTTP connections. |
||
unity.port |
integer [0-65535] |
The HTTP port to be used. |
||
unity.advertisedHost |
string |
The hostname or IP address (optionally with port), which is advertised externally. Examples: login.unity.com or login.unity.com:8443. If host is not advertised externally this value must be set to the |
||
unity.initialAdminUsername |
string |
Username of the FENIX administrator to be installed in the system upon first installation. This is also the initial Unity-IdM administrator. |
||
unity.initialAdminPassword |
string |
Password of the FENIX & Unity-IdM administrator to be installed to the empty database. |
||
unity.proxyCount |
integer [0 - 32] |
If set to 0 then it is assumed then Unity-IdM server is not behind a proxy. Otherwise the number should specify the number of (local, trusted) proxies that are protecting the server from the actual clients. In effect the assumed client IP will be taken from the X-Forwarded-For header, stripping the trailing ones from intermediary proxies. Note that only proxy servers setting X-Forwarded-For are supported. |
||
unity.pki.keyStore.file |
filesystem path on Ansible management host |
Credential location. |
||
unity.pki.keyStore.type |
[jks, pkcs12] |
Format of the credential. |
||
unity.pki.keyStore.password |
string |
Password required to load the credential. Keystore must use the same key password as the keystore password. |
||
unity.db.host |
string |
The hostname or IP address (optionally with port) that points to the PostgreSQL instance e.g. localhost:5432 |
||
unity.db.dbName |
string |
PostgreSQL database name used by Unity-IdM instance. |
||
unity.db.username |
string |
Unity-IdM database username. |
||
unity.db.password |
string |
Unity-IdM database password. |
||
unity.cIdP |
Configuration that contains the Central IdP OAuth client’s credentials used on Unity-IdM side for authentication via Central IdP.
|
|||
unity.cIdP.clientId |
string |
Client identifier, obtained during Unity’s registration at the Central IdP. |
||
unity.cIdP.clientSecret |
string |
Client secret, obtained during Unity’s registration at the Central IdP. |
||
unity.cIdP.discoveryEndpoint |
string |
Central IdP OpenID Connect Discovery endpoint address, for production environment https://central-proxy.fenix-ri.eu/.well-known/openid-configuration and for the acceptance environment https://proxy.acc.fenix.eduteams.org/.well-known/openid-configuration |
||
unity.mail |
Configuration of Unity-IdM mail notifications subsystem, used by FURMS to send invitations, applications, policy acceptance information etc. Mail configuration is optional.
|
|||
unity.mail.from |
string |
User name which will be used for From: field of the email. It is also used as SMTP envelope return address. |
||
unity.mail.smtp.host |
string |
The SMTP server to connect to. |
||
unity.mail.smtp.port |
integer [0-65535] |
The SMTP server port to connect to. |
||
unity.mail.smtp.username |
string |
User name to authenticate SMTP connection. |
||
unity.mail.smtp.password |
string |
Password to authenticate SMTP connection. |
||
unity.msgTemplates |
Configuration of email templates used by FURMS to send notifications. This configuration is optional, FURMS comes with default config file and default email template files.
|
|||
unity.msgTemplates.configuration |
filesystem path on Ansible management host |
Unity message templates configuration file. |
||
unity.msgTemplates.files |
filesystem path on Ansible management host |
Path to directory with HTML body files used by message templates. |
||
--- FURMS service configuration --- |
||||
furmsServer.host |
string |
The hostname or IP address for HTTP connections. |
||
furmsServer.port |
integer [0 - 65535] |
The HTTP port to be used. |
||
furmsServer.advertisedHost |
string |
The hostname or IP address (optionally with port), which is advertised externally. Examples: login.unity.com or login.unity.com:8443. If host is not advertised externally this value must be set to the |
||
furmsServer.pki.keyStore.file |
filesystem path on Ansible management host |
Credential location. |
||
furmsServer.pki.keyStore.type |
[jks, pkcs12] |
Format of the credential. |
||
furmsServer.pki.keyStore.password |
string |
Password required to load the credential. Keystore must use the same key password as the keystore password. |
||
furmsServer.db.host |
string |
The hostname or IP address (optionally with port) that points to the PostgreSQL instance e.g. localhost:5432 |
||
furmsServer.db.dbName |
string |
PostgreSQL database name used by FURMS service instance. |
||
furmsServer.db.username |
string |
FURMS service database username |
||
furmsServer.db.password |
string |
FURMS service database password |
||
furmsServer.preSharedKeys.cIdP |
The cIdP key is defined by FURMS administrator. The information entered here setup the base authentication credentials, used to access the FURMS REST API exposed for Central IdP. |
|||
furmsServer.preSharedKeys.cIdP.username |
string |
Username for Central IdP REST API credential |
||
furmsServer.preSharedKeys.cIdP.password |
string |
Password for Central IdP REST API credential |
||
furmsServer.broker |
Configuration options to setup connection with the RabbitMQ. |
|||
furmsServer.broker.host |
string |
The hostname or IP address that points to the RabbitMQ instance. |
||
furmsServer.broker.port |
integer [0-65535] |
RabbitMQ port to which to connect. |
||
furmsServer.broker.username |
string |
RabbitMQ user to use when connecting. |
||
furmsServer.broker.password |
string |
RabbitMQ password for this user |
||
furmsServer.broker.virtualHost |
string |
RabbitMQ virtual host name to which to connect. |
||
furmsServer.ui |
Configuration of user interface related features. |
|||
furmsServer.ui.maxSessionInactivityInSeconds |
integer (default 1800) |
Optional value, that defines number of seconds where users inactivity cases the automatic logout operation from FURMS UI. |
||
furmsServer.ui.secondsBeforeShowingLogoutWarning |
integer (default 120) |
Optional value that, defines number of seconds before the user is shown the warning message about automatic logout from FURMS UI. |
||
furmsServer.layout |
Configuration of FURMS UI look&feel.
|
|||
furmsServer.layout.cssStyle |
filesystem path on Ansible management host |
Optional value with custom CSS styles applied to FURMS UI. |
||
furmsServer.layout.panels |
Configuration of FURMS UI outer panels.
|
|||
furmsServer.layout.panels.top |
filesystem path on Ansible management host |
Optional value which provides HTML content of the top outer element displayed in the FURMS application. |
||
furmsServer.layout.panels.bottom |
filesystem path on Ansible management host |
Optional value which provides HTML content of the bottom outer element displayed in the FURMS application. |
||
furmsServer.layout.panels.left |
filesystem path on Ansible management host |
Optional value which provides HTML content of the left outer element displayed in the FURMS application. |
||
furmsServer.layout.panels.right |
filesystem path on Ansible management host |
Optional value which provides HTML content of the right outer element displayed in the FURMS application. |
||
| Any reconfiguration of aforementioned options in the case of FURMS installation from scratch, is currently supported only by reinstallation from scratch. You have to update the settings, drop databases (if stack was already started), and install FURMS stack again. |
Email templates configuration
FURMS utilizes Unity-IdM notification subsystem, therefore in order to setup email templates used by FURMS, administrator has to create the Unity-IdM configuration files, described in the next subsections, and put a reference to those in the Ansible group variables file.
Message templates configuration
This particular configuration file is parsed by Unity-IdM and defines all email template definitions. Below is the default content:
master-furms-header.subject.en=
master-furms-header.consumer=Generic
master-furms-header.type=HTML
master-furms-header.bodyFile.en=${CONF}/msgTemplates/masterTemplate-furms-head.html

master-furms-footer.subject.en=
master-furms-footer.consumer=Generic
master-furms-footer.type=HTML
master-furms-footer.bodyFile.en=${CONF}/msgTemplates/masterTemplate-furms-footer.html

policyAcceptanceNew.subject.en=Fenix policy document awaits acceptance
policyAcceptanceNew.consumer=UserNotification
policyAcceptanceNew.notificationChannel=default_email
policyAcceptanceNew.type=HTML
policyAcceptanceNew.bodyFile.en=${CONF}/msgTemplates/policyAcceptanceNew.html

policyAcceptanceRevision.subject.en=Fenix policy document was updated
policyAcceptanceRevision.consumer=UserNotification
policyAcceptanceRevision.notificationChannel=default_email
policyAcceptanceRevision.type=HTML
policyAcceptanceRevision.bodyFile.en=${CONF}/msgTemplates/policyAcceptanceRevision.html

invitationNew.subject.en=New role to accept
invitationNew.consumer=UserNotification
invitationNew.notificationChannel=default_email
invitationNew.type=HTML
invitationNew.bodyFile.en=${CONF}/msgTemplates/invitationNew.html

registrationInvitation.subject.en=You have been invited to the FURMS app
registrationInvitation.consumer=InvitationWithCode
registrationInvitation.notificationChannel=default_email
registrationInvitation.type=HTML
registrationInvitation.bodyFile.en=${CONF}/msgTemplates/registrationInvitation.html

invitationAccepted.subject.en=Invitation has been accepted
invitationAccepted.consumer=UserNotification
invitationAccepted.notificationChannel=default_email
invitationAccepted.type=HTML
invitationAccepted.bodyFile.en=${CONF}/msgTemplates/invitationAccepted.html

invitationRejected.subject.en=Invitation has been rejected
invitationRejected.consumer=UserNotification
invitationRejected.notificationChannel=default_email
invitationRejected.type=HTML
invitationRejected.bodyFile.en=${CONF}/msgTemplates/invitationRejected.html

applicationNew.subject.en=You have received new application
applicationNew.consumer=UserNotification
applicationNew.notificationChannel=default_email
applicationNew.type=HTML
applicationNew.bodyFile.en=${CONF}/msgTemplates/applicationNew.html

applicationAccepted.subject.en=Application has been accepted
applicationAccepted.consumer=UserNotification
applicationAccepted.notificationChannel=default_email
applicationAccepted.type=HTML
applicationAccepted.bodyFile.en=${CONF}/msgTemplates/applicationAccepted.html

applicationRejected.subject.en=Application has been rejected
applicationRejected.consumer=UserNotification
applicationRejected.notificationChannel=default_email
applicationRejected.type=HTML
applicationRejected.bodyFile.en=${CONF}/msgTemplates/applicationRejected.html

resourceUsageAlarm.subject.en=Resource usage alarm
resourceUsageAlarm.consumer=UserNotification
resourceUsageAlarm.notificationChannel=default_email
resourceUsageAlarm.type=HTML
resourceUsageAlarm.bodyFile.en=${CONF}/msgTemplates/resourceUsageAlarm.html

resourceUsageAlarmWithoutUrl.subject.en=Resource usage alarm
resourceUsageAlarmWithoutUrl.consumer=UserNotification
resourceUsageAlarmWithoutUrl.notificationChannel=default_email
resourceUsageAlarmWithoutUrl.type=HTML
resourceUsageAlarmWithoutUrl.bodyFile.en=${CONF}/msgTemplates/resourceUsageAlarmWithoutUrl.html
The path to this file shall be provided in the unity.msgTemplates.configuration property value in the Ansible groups variable file. Note that there are couple of predefined message template definitions that must be preserved. The following template definitions are used by FURMS:
-
policyAcceptanceNew- utilized to notify user about new policy document to accept, -
policyAcceptanceRevision- utilized to notify user that existing policy has been updated and awaits approval, -
invitationNew- utilized to send invitations to existing users who were invited to new roles, -
registrationInvitation- utilized to send invitations to create a new account in FURMS to prospective users, -
invitationAccepted- utilized to send information that particular user has accepted the invitation to new role, email is send to administrators of originating group as well as to the person who initiated the invitation, -
invitationRejected- utilized to send information that a user has rejected the invitation to new role, email is send to administrators of originating group as well as to the person who initiated the invitation, -
applicationNew- utilized to send information to particular project’s administrators that a new user has applied for project membership, -
applicationAccepted- utilized to send information to a user, that her/his application to become member of a project, has been accepted by project administrator, -
applicationRejected- utilized to send information to a user, that her/his application to become member of a project, has been rejected by project administrator. -
resourceUsageAlarm- utilized to send notification to configured project administrators and users, that resource usage alarm reached its threshold. -
resourceUsageAlarmWithoutUrl- utilized to send notification to configured users who are not members of the project, that resource usage alarm reached its threshold.
Most of the configuration in the default message template file should not be changed. It is recommended for system administrator to adjust the template subject only.
Email template body files
Given the default template configuration file, FURMS system administrator has to create the following email template body files:
-
policyAcceptanceNew.html- used bypolicyAcceptanceNewtemplate definition, -
policyAcceptanceRevision.html- used bypolicyAcceptanceRevisiontemplate definition, -
invitationNew.html- used byinvitationNewtemplate definition, -
registrationInvitation.html- used byregistrationInvitationtemplate definition, -
invitationAccepted.html- used byinvitationAcceptedtemplate definition, -
invitationRejected.html- used byinvitationRejectedtemplate definition, -
applicationNew.html- used byapplicationNewtemplate definition, -
applicationAccepted.html- used byapplicationAcceptedtemplate definition, -
applicationRejected.html- used byapplicationRejectedtemplate definition, -
resourceUsageAlarm.html- used byresourceUsageAlarmtemplate definition, -
resourceUsageAlarmWithoutUrl.html- used byresourceUsageAlarmWithoutUrltemplate definition, -
masterTemplate-furms-head.html- header that can be utilized in body files of other HTML templates. In the resolved HTML email the${include:master-furms-head}tag is replaced with the header content, -
masterTemplate-furms-footer.html- footer that can be utilized in body files of other HTML templates. In the resolved HTML email the${include:master-furms-footer}tag is replaced with the footer content.
The path to the directory that stores the aforementioned HTML template files, shall be provided in the unity.msgTemplates.files property value in the Ansible groups variable file.
Example of policyAcceptanceNew.html file:
${include:master-furms-header}
<p>Dear User,</p>
<p>There is a new policy document awaiting your acceptance.</p>
<p>Please read the '${custom.name}' document available <a href="${custom.furmsUrl}">here</a>.
</p>
${include:master-furms-footer}
Email templates can use custom variables that define dynamic contents set by FURMS when sending notifications. The following table provides information about variables available in the particular HTML template.
| HTML template file name | Variable | Description of resolved variable in template |
|---|---|---|
policyAcceptanceNew.html |
|
Policy document name |
|
URL to FURMS that points to the User Settings → Policy Documents view |
|
invitationNew.html |
|
FURMS role that invitee is requested to accept |
|
URL to FURMS that points to the User Settings → Invitations view |
|
registrationInvitation.html |
|
FURMS role that invitee is requested to accept |
|
URL to Unity-IdM that points to the registration form |
|
invitationAccepted.html |
|
FURMS role that invitee has accept/rejected |
|
Email address of person that either accepted or declined the invitation |
|
applicationNew.html |
|
Project name for which user has requested membership |
|
Email address of person that requested membership to a project |
|
|
URL to FURMS that points to particular project’s Users view |
|
applicationAccepted.html |
|
Project name for which user has requested membership |
resourceUsageAlarm.html |
|
Project allocation name for which alarm was raised |
|
Name of the alarm which triggered notification |
|
|
URL of FURMS project, which triggered the alarm |
|
resourceUsageAlarmWithoutUrl.html |
|
Project allocation name for which alarm was raised |
|
Name of the alarm which triggered notification |
Styling FURMS application
FURMS UI look & feel adjustments are achieved through custom CSS configuration that overrides the default styles.
The custom CSS is provided in a file that can be configured in furmsServer.layout.cssStyle property of Ansible groups variable file. Administrator is capable to customize:
-
color and size of main layout components like menu, breadcrumb view, page content view,
-
color scheme,
-
font scheme including font sizes.
In order to customize the main layout components, administrator must find the corresponding component’s HTML ID, and then provide the style changes in the aforementioned custom CSS file, here is the example of such style changes:
/*
 * Changes the width and background color of the right side menu.
 */
#furms-layout-menu {
    width: 25rem;
    background-color: magenta;
}

/*
 * Changes background color of the component that displays the content of page view.
 */
#furms-layout-main {
    background-color: white;
}

/*
 * Changes the style of breadcrumb view.
 */
#header {
    height: 10rem;
    background-color: gray;
}
Any other changes like color scheme & fonts, can be done with help of Vaadin styles editor. Using this editor the administrator is capable to change the overall look&feel of the entire application. The styles editor provides convenient way of styling the web components, and generates the CSS that can be included in FURMS custom CSS file. In order to do so, after finishing the styling in Vaadin styles editor, the administrator should click on the "Download" button on the top right corner of the page, copy the "html" CSS section from the popup, and paste it into the custom CSS file, example of copied "html" styles:
html {
  --lumo-shade-5pct: rgba(72, 129, 203, 0.05);
  --lumo-shade-10pct: rgba(72, 129, 203, 0.1);
  --lumo-shade-20pct: rgba(72, 129, 203, 0.2);
  --lumo-shade-30pct: rgba(72, 129, 203, 0.3);
  --lumo-shade-40pct: rgba(72, 129, 203, 0.4);
  --lumo-shade-50pct: rgba(72, 129, 203, 0.5);
  --lumo-shade-60pct: rgba(72, 129, 203, 0.6);
  --lumo-shade-70pct: rgba(72, 129, 203, 0.7);
  --lumo-shade-80pct: rgba(72, 129, 203, 0.8);
  --lumo-shade-90pct: rgba(72, 129, 203, 0.9);
  --lumo-shade: hsl(214, 56%, 54%);
}
FURMS UI outer panels
Outer panels are fixed HTML contents that can be displayed on top, bottom, right and/or left side of the FURMS UI application, typically to include additional information for users e.g. with links or legal information. In order to configure e.g. bottom panel, administrator must create a HTML file and configure the path to it in the furmsServer.layout.panels.bottom property of the Ansible groups variable file.
| The HTML content of a panel must consists of exactly one top level element, example: |
<!-- example of bottom pannel -->
<div style="background-color:gray; height:50px; width:100%;">
    <!--
            Here goes the content of the panel.
    -->
</div>
Install FURMS stack
Once configuration is finished, the following command will install the Unity-IdM as well as FURMS service:
> cd $FURMS_ROOT_DIR
> ansible-playbook -i inventory furms-devops-tooling/install-stack.yml
After installation the services are available in directory pointed out in installDir property defined in $FURMS_ROOT_DIR/group_vars/all.yml file.
FURMS system minor update procedure
Minor FURMS updates are performed whenever a newly installed software version differs only with the last number when compared to the currently installed one. Database backup is advised, however in the minor update case the risk is minimal - revision releases typically do not introduce database content migrations. The following steps provide example how to update the FURMS service into 1.0.1 version, assuming 1.0.0 is installed:
-
Install minor update:
-
enter the
$FURMS_ROOT_DIRdirectory, -
update the
furmsVersionproperty defined ingroup_vars/all.ymlfile, change its value to1.0.1 -
execute:
ansible-playbook -i inventory furms-devops-tooling/install-minor-update.yml
-
Upgrade from 1.0 to 2.0 release
This section describes the FURMS 2.0 release installation steps basing on 1.0 release configuration. Note that it is required to drop the databases for FURMS service as well as for Unity-IdM, however all of the Ansible related configuration shall be reused.
-
Install and configure RabbitMQ broker according to guidelines from this section.
-
Drop PostgreSQL database used by Unity-IdM instance.
-
Drop PostgreSQL database used by FURMS service instance.
-
Update the FURMS Ansible scripts to the latest version, execute
./install_furms_devops_tooling.pyin the directory where tooling was installed. -
Update the trustStore file: add the public CA certificate which is at the top of the certificates chain used to sign Broker credential.
-
Update your existing
groups_var/all.ymlAnsible configuration file:-
change the version of furmsVersion to
2.0.0 -
add the following configuration under the furmsServer:
furmsServer:
	...
    broker:
        host:                -- set -- me --
        port:                -- set -- me --
        username:            -- set -- me --
        password:            -- set -- me --
        virtualHost:         -- set -- me --
    ui:
        maxSessionInactivityInSeconds:     -- set -- me -- #optional: default 1800
        secondsBeforeShowingLogoutWarning: -- set -- me -- #optional: default 120
-
Upgrade from 2.0 to 3.0 release
This section describes the FURMS 3.0 release installation steps basing on 2.0 release configuration. This procedure does not require dropping any of the databases, and all of the Ansible related configuration is reused.
-
Make a backup of PostgreSQL database used by Unity-IdM instance.
-
Make a backup of PostgreSQL database used by FURMS service instance.
-
Update the FURMS Ansible scripts to the latest version, execute
./install_furms_devops_tooling.pyin the directory where tooling was installed. -
Update your existing
groups_var/all.ymlAnsible configuration file:-
change the version of furmsVersion to
3.0.0 -
add the following configuration under the unity:
unity: ... mail: from: -- set -- me -- smtp: host: -- set -- me -- port: -- set -- me -- username: -- set -- me -- password: -- set -- me -- msgTemplates: # this section is optional, if not provided the default configuration is delivered files: -- set -- me -- configuration: -- set -- me -- -
To customize the default message templates used by FURMS to send email notifications, please refer to the Email templates configuration section.
-
-
Make sure that RabbitMQ broker is up and running.
Upgrade from 3.0 to 3.1 release
This section describes the FURMS 3.1 release installation steps basing on 3.0 release configuration. This release does not introduce any new Ansible configuration, so the installation straight forward.
-
Make a backup of PostgreSQL database used by Unity-IdM instance.
-
Make a backup of PostgreSQL database used by FURMS service instance.
-
Update the FURMS Ansible scripts to the latest version, execute
./install_furms_devops_tooling.pyin the directory where tooling was installed. -
Update your existing
groups_var/all.ymlAnsible configuration file and change the version of furmsVersion to3.1.0 -
Make sure that RabbitMQ broker is up and running.
Upgrade from 3.x to 4.0 release
This section describes the FURMS 4.0 release installation steps basing on 3.x release configuration. This procedure does not require dropping any of the databases, and all of the Ansible related configuration is reused.
-
Make a backup of PostgreSQL database used by Unity-IdM instance.
-
Make a backup of PostgreSQL database used by FURMS service instance.
-
Update the FURMS Ansible scripts to the latest version, execute
./install_furms_devops_tooling.pyin the directory where tooling was installed. -
Update your existing
groups_var/all.ymlAnsible configuration file:-
change the version of furmsVersion to
4.0.0 -
add the following configuration:
...
backupDir:                  -- set -- me --
...
furmsServer:
	...
	layout:                 # this section is optional, comment out whole section if not used
	  cssStyle:             -- set -- me --
	  panels:
	    top:                -- set -- me --
	    left:               -- set -- me --
	    right:              -- set -- me --
	    bottom:             -- set -- me --
-
-
Optional step: the
resourceUsageAlarm.htmlandresourceUsageAlarmWithoutUrl.htmlemail templates has been introduced in this release. If the administrator will not configure customized templates, then the default once are used. Please refer to the Email templates configuration section in case aforementioned email template customizations are required. -
Make sure that RabbitMQ broker is up and running.
Operating the system
Starting FURMS stack
Once FURMS stack has been installed, the following command starts the FURMS stack - Unity-IdM server as well as FURMS service:
> cd $FURMS_ROOT_DIR
> ansible-playbook -i inventory furms-devops-tooling/start-stack.yml
Stopping FURMS stack
At any time the FURMS stack can be stopped using the following command:
> cd $FURMS_ROOT_DIR
> ansible-playbook -i inventory furms-devops-tooling/stop-stack.yml
Runtime directories structure, log files
The following listing shows example directory structure after FURMS installation:
./20210211-214739
./20210211-214739/furms-server -> furms-server-1.0.0
./20210211-214739/furms-server-1.0.0
./20210211-214739/furms-server-1.0.0/furms-server
./20210211-214739/unity -> unity-server-3.4.3
./20210211-214739/unity-server-3.4.3
./20210211-214739/unity-server-3.4.3/conf
./20210211-214739/unity-server-3.4.3/bin
./20210211-214739/unity-server-3.4.3/webContents
./20210211-214739/unity-server-3.4.3/data
./20210211-214739/unity-server-3.4.3/workspace
./20210211-214739/unity-server-3.4.3/extra
./20210211-214739/unity-server-3.4.3/lib
./20210211-214739/unity-server-3.4.3/conf-orig
./current -> 20210211-214739
./logs
./workspace
The workspace/ directory can be ignored, it contains temporary installation data. The current symlink points to the currently active revision. It is especially relevant when there are more than one installation. There is also logs directory that contains log files from both, FURMS service as well as Unity-IdM.
Inside the current/ directory there are both services installed. The runtime data like PIDs and other can be found there.
Note that it is not advised to perform reconfigurations in the installation directories. Such changes will be lost during subsequent update with use of Ansible.
Authentication to Unity console
Access to Unity administration console should not be in general required for running FURMS, it may be however convenient to diagnose problems or to perform advanced configuration actions.
Unity console is available at the configured address of Unity server:
https://{{unity.advertisedHost}}/console.
Login credentials are set to the ones from Ansible configuration: {{unity.initialAdminUsername}} and {{unity.initialAdminPassword}}.
Backup and restore
The following sections provides detailed information on steps that needs to be taken in order to take system backup, and the steps to restore it from scratch basing on the backup data.
FURMS devops tooling comes with handy Ansible Playbooks to perform backup and restore operations, therefore all the operations are performed on Ansible management hosts. The backup files are stored under the directory pointed out by backupDir parameter in the Ansible group vars configuration file. It is system administrator responsibility to store backups in a secure place.
|
Backup
The backup-furms.yml Ansible Playbook performs the FURMS backup which is placed under subdirectory of backupDir. The subdirectory name consists of date, time and FURMS version e.g. 2022-01-19_10:33:27_v4.0.0. The backup consists of the following files:
-
Compressed FURMS database dump file named:
<furmsServer.db.dbName>.dump.tar.gz, -
Compressed Unity-IdM database dump file named:
<unity.db.dbName>.dump.tar.gz, -
Compressed Ansible configuration file named:
ansible_config.tar.gz. The archive consists ofinventoryandgroup_varsdirectory, as well as FURMS configuration files e.g. email templates, truststore etc.
In order to perform backup execute the following on Ansible management host:
> cd $FURMS_ROOT_DIR
> ansible-playbook -i inventory furms-devops-tooling/backup-furms.yml
Restore
Depending upon whether system should be restored from scratch or only the database should be recovered, the steps taken by administrator differ.
Restoring FURMS databases from backup
Restore of FURMS databases requires the stack to be stopped before running Ansible playbook responsible for this operation.
In order to restore the FURMS and Unity-IdM databases at once, basing on a backup files done by Ansible tooling, perform the following on the management host:
-
Restore FURMS databases from backup, execute:
> cd $FURMS_ROOT_DIR
> ansible-playbook -i inventory furms-devops-tooling/restore-furms.yml --extra-vars "dbDumpDirName=2022-01-19_10:33:27_v4.0.0"
Where
dbDumpDirNameused in the command above is the subdirectory name, placed underbackupDirconfigured in Ansible group vars file.It is also possible to restore the databases pointing out full directory path with backup files using
dbDumpDirPathinstead ofdbDumpDirNamee.g.:> cd $FURMS_ROOT_DIR > ansible-playbook -i inventory furms-devops-tooling/restore-furms.yml --extra-vars "dbDumpDirPath=/home/furms/backups/2022-01-19_10:33:27_v4.0.0/"
Restore FURMS system from scratch
This section describes steps to restore the system from scratch basing on a backup.
Prerequisites:
-
System administrator has access to the FURMS backup files, performed by Backup tool.
-
PostgreSQL service is up and running,
-
Broker service is up and running,
-
Ansible Management host is up and running.
Restore procedure:
-
Login to the host that shall act as Ansible Management host.
-
Install the FURMS devops tools, refer to FURMS devops tools installation utility section.
-
Restore Ansible configuration files from backup of your choice.
The backup of Ansible configuration is stored in
ansible_config.tar.gzarchive, which is placed in the backup directory. Uncompress it and restore Ansible related files as well as FURMS configuration relevant for your new environment setup. -
Validate whether Ansible group vars file needs reconfiguration e.g. database host and credentials for Unity-IdM and FURMS service are correct, as well as the broker configuration is valid taking into account current environment setup.
-
Create empty Unity-IdM and FURMS databases.
-
Restore FURMS databases from the backup of your choice, refer to Restoring FURMS databases from backup section.
-
Make sure that Broker is up and running.